DALL-E generated image inspired by the Styx Single cover for the hit Mr. Roboto
Today’s post builds on my last two which showed the steps I took towards building a Chat API (which I call the Roboto API) using an OpenAI GPT-4 model and Retrieval Augmented Generation. If you have not had a chance to read it, please take a look at Part 1 and Part 2.
Once I had the Roboto Chat API responding to a single message, I went about building a React Frontend to interact with the API. Having a working UI helped me test the API much better especially when trying different follow up prompts and then getting the UI responding interactively.
I first generated the main Chat frontend (I called this project the Roboto UI) using Vercel V0,where I was able to put together a complete and working React interface in a fraction of the time it would have taken me by hand. I used the following 3 prompts in Vercel:
I would like to create a basic chat bot ui
can you add preselected prompts
I dont want to scroll right for the preselected prompts
That’s it! It then produced code for the following screen:
Figure 1. Vercel V0 generated React Chat Bot
After moving the code into Cursor AI, I made some modifications to the interface and wired up the Roboto Chat API using the following code:
Once the messages list is populated, the following code (generated by Vercel V0 from my prompts earlier), renders 3 react components a CardHeader, CardContent and ChatMessage, all inside the main Card component.
Figure 2. Key React components inside main Roboto UI page.tsx
We then iterate through the messages list and pass the content (which at this point contains the Roboto Chat API‘s response) to the ChatMessages component through its props. To give the interface a bit more of a Chat GPT feel, I got Cursor to add in a TypewriterText component which gets called inside the ChatMessage component.
Here’s what the final version of the Mr Roboto Chatbot looks like:
Figure 3. Roboto UI after code adjustments in Cursor
Lets take a look at how Mr Roboto engages in conversation in the following video:
Developing the Chat API and integrating it with a Chat UI provided invaluable insights into the practical applications of language models, demonstrating how they can address challenges in ways beyond traditional logic-driven coding. This project not only improved my understanding of React but also highlighted the value of rapid prototyping with Vercel. There are few more ideas I’m hoping to explore in the coming weeks, so I’m going to get back to coding those up!
Before I go, here’s the track that keeps with today’s theme of talking Robots:
Styx, one of rock’s most innovative bands, captured the imagination of a generation with the 1983 hit “Mr. Roboto” from their album Kilroy Was Here. Blending theatrical storytelling with futuristic themes, the song quickly became a cultural phenomenon, resonating with fans worldwide and sparking conversations about technology, identity, and human interaction. Its catchy synth riffs and memorable lyrics helped cement its status as an enduring pop culture icon, influencing countless artists and shaping discussions about the intersection of art and technology. Notably, its impact was further solidified when it was featured on an episode of Glee, introducing the classic to a whole new audience – Source ChatGPT
Dall-E generated referencing Men At Work’s Business as Usual Album cover
Today’s post pays tribute to that catchy lyric (seen in the title) from Men At Work’s iconic hit Land Down Under. The song follows a traveler experiencing different cultures, emphasizing the universal human connection—whether through sharing a meal, offering hospitality, or simply exchanging a smile, even when language isn’t shared. The song’s theme of communication—or the challenges of understanding one another—got me thinking about how AI is already solving many of the problems traditionally faced in software systems when it comes to multilingual support.
For a long time, software systems were designed with a single language in mind. If a company wanted to support additional languages, the process was often cumbersome—requiring manual translations, hardcoded text updates, and significant development effort. Adding a new language wasn’t just about translating words; it involved restructuring UI layouts, adapting date and currency formats, and ensuring character encoding compatibility. This made localization a lengthy and expensive process, often leaving non-English speakers with limited access to technology.
As I continue to explore Azure AI’s capabilities, I wanted to put its Translation Service to the test—specifically, its ability to detect and translate languages seamlessly. To do this, I decided to enhance my Bayesian Optimized Neural Output (BONO) search by integrating language translation. This would allow it to not only process and rank results intelligently but also make them accessible in multiple languages, breaking down language barriers in search queries and results.
By leveraging Azure AI’s Translator API, my goal was to dynamically detect the input language and provide real-time translations, ensuring that users receive relevant search results in their preferred language without the need for manual intervention.
To start, I decided to build an API dedicated to language detection and translation. This API would act as an intermediary, making calls to Azure’s Translator API while providing flexibility for future enhancements. By decoupling translation from the UI, I ensured that the system could evolve—whether by expanding features or even swapping out the translation provider (from Azure to say AWS)—without requiring changes to the frontend.
Initially, I considered embedding the translation capability directly into the BONO Search API. While this would have worked, a standalone translation API offered greater reusability. It could handle more than just search queries, allowing me to integrate language detection and translation into other projects.
The new API, called the Multilingual Autodetect Wizard (MAW)—a deliberate nod to Men At Work—was designed to seamlessly integrate into the existing architecture. Its role was to handle language detection and translation independently, ensuring that other services, including BONO Search, could leverage multilingual capabilities without being tightly coupled to a specific translation provider.
The Multilingual Autodetect Wizard (MAW) therefore acts as a language processing layer between the user and the BONO Search API, enabling multilingual support. Here’s how it integrates into the system:
1. Search Query Processing via MAW
The user submits a search query in any supported language.
The query is first sent to MAW for language detection using Azure Translator’s Detect API.
2. Language Detection & Translation (If Needed)
If the detected language is English, the query is sent directly to BONO Search API as usual.
If the detected language is not English, MAW calls Azure’s Translate API to convert the query into English before forwarding it to BONO Search.
3. Search Execution
The BONO Search API processes the English query, returning relevant search results in English.
4. Translating Results Back to the Source Language
If the original query was not in English, MAW translates the search results back into the user’s source language using Azure Translator.
If the query was already in English, results are returned as-is.
5. Returning the Final Response
MAW sends the translated (or original) search results back to the user, providing the results in their preferred language.
Figure 1: BONO Flow Diagram with MAW API (click to view in another tab)
MAW API – Multilingual Autodetect Wizard
After creating the Azure Translator resource, I began setting up the MAW API .The API just provides 2 basic endpoints so altogether not a complex amount of code, but as I went through a few rounds of testing, I realized the need for extensive logging of requests to ensure I had visibility when debugging.
Key Features:
Language Detection: Identifies the language of the input text via the Detect API.
Text Translation: Converts text into a target language using the Translate API.
RESTful Endpoints:
POST /api/translator/detect → Detects the language of provided text.
POST /api/translator/translate → Translates text into the target language.
Integrating MAW API with the React UI
With a working MAW API, the next step was to integrate it into the React UI. The React project had 3 main components viz. SearchForm.tsx, SearchResults.tsx and Modal.tsx. The main code changes were in the SearchForm.tsx where I started by adding calls to the MAW endpoint for language detection, followed by translation of the search query before passing the translated results to the BONO Search API.
I’ll admit—it was fun seeing the translation of the search phrase work live on the UI for the first time! At first, I considered stopping on just translating the search phrase since I had successfully demonstrated how the system could detect and translate search queries into English. However, I realized it would be far more valuable to dynamically translate the search results as well, ensuring a fully multilingual experience.
However, after adding the code to translate the movie plots returned in the search results, I ran into some unexpected errors on the MAW API when I discovered the free tier of Azure Translator had a request limit, restricting the number of translations I could make.
Handling Translation Limits with AI-Assisted Development
At first, I naturally considered upgrading to a higher Azure tier to increase my quota. At the suggestion of Claude 3.5, which had a view of my codebase and constraints through the Cursor IDE, it quickly generated a retry mechanism for the translation request, which would first detect the limit, pause and retry the request. This change does introduce a pause when the retry mechanism is triggered and unfortunately with a larger result set, reaching the quota limit is unavoidable. However for test purposes, this worked great.
After getting a working version, I realized that the SearchForm.tsxReact component was now getting too cluttered with API requests. Instead of manually refactoring, I simply prompted Cursor to extract API calls into separate services.
Updated BONO Search User Interface
I tested the new search UI with the following phrases:
Language
Query
Detection Result
Translation
English
Boy learns Karate to defend himself from bullies
en
Not Applicable
French
Un garçon apprend le karaté pour se défendre contre les intimidateurs
fr
Query from fr to en Result from en to fr
Spanish
Niño aprende Karate para defenderse de los matones
Altogether the results were impressive. Azure’s AI language service enabled a system written with content from a single language viz. English to support several other languages without alteration. Even with a language like Zulu, spoken only in Southern Africa, Azure’s AI language service could translate the search phrase with relative accuracy into English.
Land Down Under was released in 1981 by the Australian band Men at Work as part of their debut album Business as Usual. The song quickly became an international hit, topping charts in multiple countries, including the U.S., U.K., and Australia. Its catchy flute riff and vivid storytelling capture the spirit of adventure, cultural encounters, and national identity. With lyrics that follow a wandering traveler meeting eccentric characters around the world, the song remains an iconic anthem celebrating Australia’s unique charm and global presence.
In this post, we’ll take a closer look at the technical components I built while putting together the U2-inspired BONO search system. Previously, we explored the PostgreSQL database and how I ran both semantic and lexical search queries on a table called movies. Now, we’ll dive deeper into the API and UI layers that bring this search system to life.
The BONO Search Database
To set up this database and the movies table, I followed these steps using an existing Azure subscription.
Created an instance of the Azure Database for PostgreSQL flexible server
Set up the necessary azure.extensions parameters in the database:
AZURE_AI
VECTOR
PG_TRGM
Created the necessary PostgreSQL extensions by running the following through the psql command line tool
CREATE EXTENSION IF NOT EXISTS vector;
CREATE EXTENSION IF NOT EXISTS azure_ai;
CREATE EXTENSION IF NOT EXISTS pg_trgm;
Created a “movies” table with the following columns (id, name, plot, plot_vector)
Uploaded movie data from a csv file to the movie table using a PowerShell script
Created an Azure Open AI resource
Deployed a text-embedding-ada-002 model
Configured the Azure Open AI resource url and key in the PostgreSQL database by calling azure_ai.set_setting method for each of these settings
Vectorized the movie data from the plot column and store the result in the plot_vector column using another PowerShell script
In the previous post, you may have noticed that the SQL queries referenced the text-embedding-ada-002 model multiple times. This is Open AI’s embedding model, which converts both plot descriptions and search queries from natural language into numeric vector representations. These vectorized representations, combined with transformer-based architecture, enable semantic search by allowing similarity comparisons based on meaning rather than exact keyword matches.
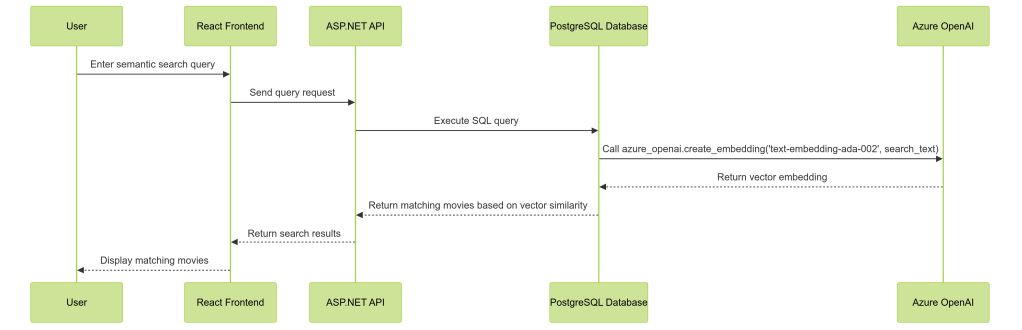
The BONO search system altogether comprises 4 main parts, namely a React UI, an ASP.net API, the PostgreSQL database server and of course the Azure Open AI resource hosting the deployed embedding model.
We can see how these components work together for a Semantic search query:
The BONO Search API
Having set up the database I began working next on the API. This was written in C# as an ASP.net (ver 8.0) API. A structure of this API can be seen here:
## Project Structure
BonoSearch/
├── Data/
│ └── MovieDbContext.cs # EF Core DB Context
├── Models/
│ ├── Movie.cs # Movie entity
│ └── DTOs/
│ └── MovieDto.cs # Data Transfer Object
└── Repositories/
└── MovieRepository.cs # Data access layer
└── Services/
└── MovieService.cs # Business logic layer
After first implementing Semantic Search, I then added Lexical and Hybrid Search endpoints to expand the system’s capabilities. These queries are defined within the MovieRepository and accessed via the MovieService. This is the code to one of the methods from the repository
public async Task<IEnumerable<MovieDto>> SemanticSearch(string query)
    {
        var parameters = new NpgsqlParameter[]
        {
            new("query", query),
            new("embedding_model", EMBEDDING_MODEL)
        };

        var movies = await _context.Set<Movie>()
            .FromSqlRaw(@"
                SELECT m.id AS Id,
                       m.name AS Name,
                       m.plot AS Plot
                FROM movies m
                ORDER BY m.plot_vector <=> azure_openai.create_embeddings(@embedding_model, @query)::vector
                LIMIT 5", parameters)
            .ToListAsync();

        return movies.Select(m => new MovieDto
        {
            Id = m.Id,
            Name = m.Name,
            Plot = m.Plot
        });
    }
A key detail to note here is the use of Entity Framework’s FromSqlRaw method with parameters, ensuring that dynamic SQL execution is handled safely to prevent SQL injection. This approach maintains both flexibility and security while executing raw SQL queries.
The BONO Search UI
As I’m currently learning to code in React, I decided to try and build the front end using React with Next.js as well as Typescript and Tailwind css. AI coding tools such as Cursor and Vercel’s V0 were a huge help in getting this completed and being able to converse with the AI model on elements of the code for explanations was an effective learning experience.
The React project contains 3 main components
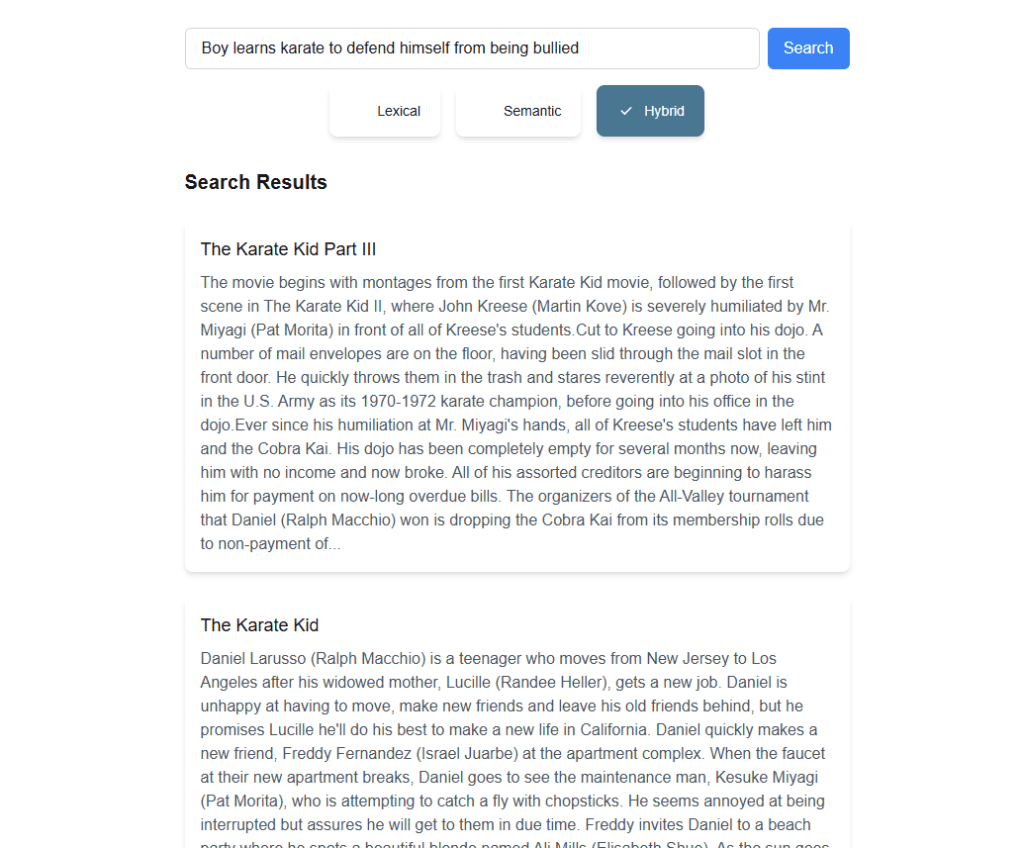
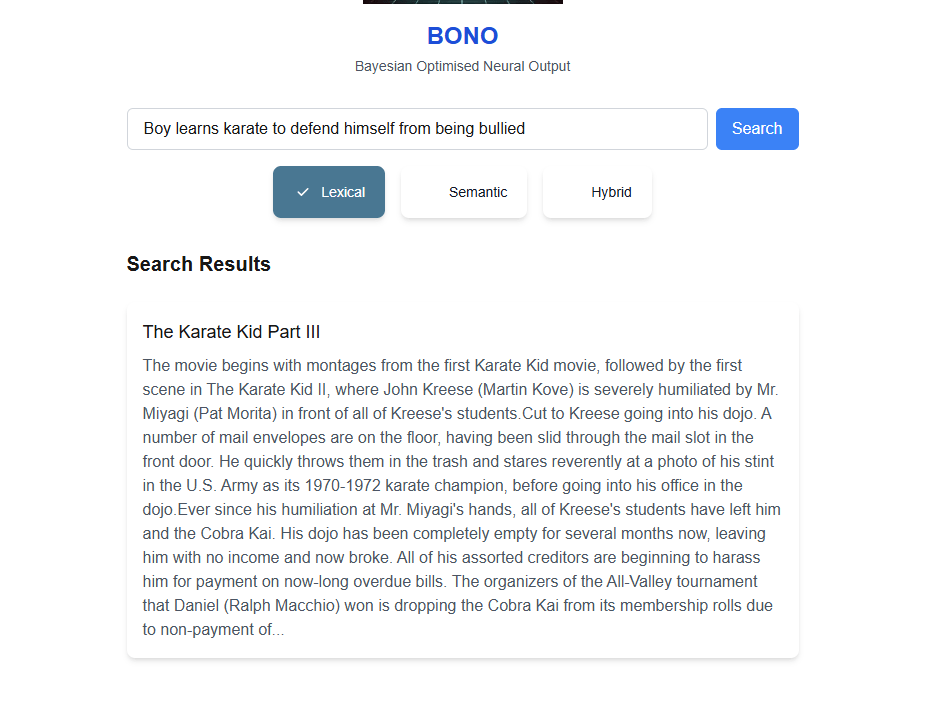
SearchForm.tsx – Responsible for:
Rendering the main search components (input box, search button, radio selectors).
Sending queries to the search API and updating searchResults.
Passing searchResults to the SearchResults component.
SearchResults.tsx – Handles:
Displaying the search results (movie name and truncated plot).
Setting up an onClick handler to pass selected movie details to Modal.tsx.
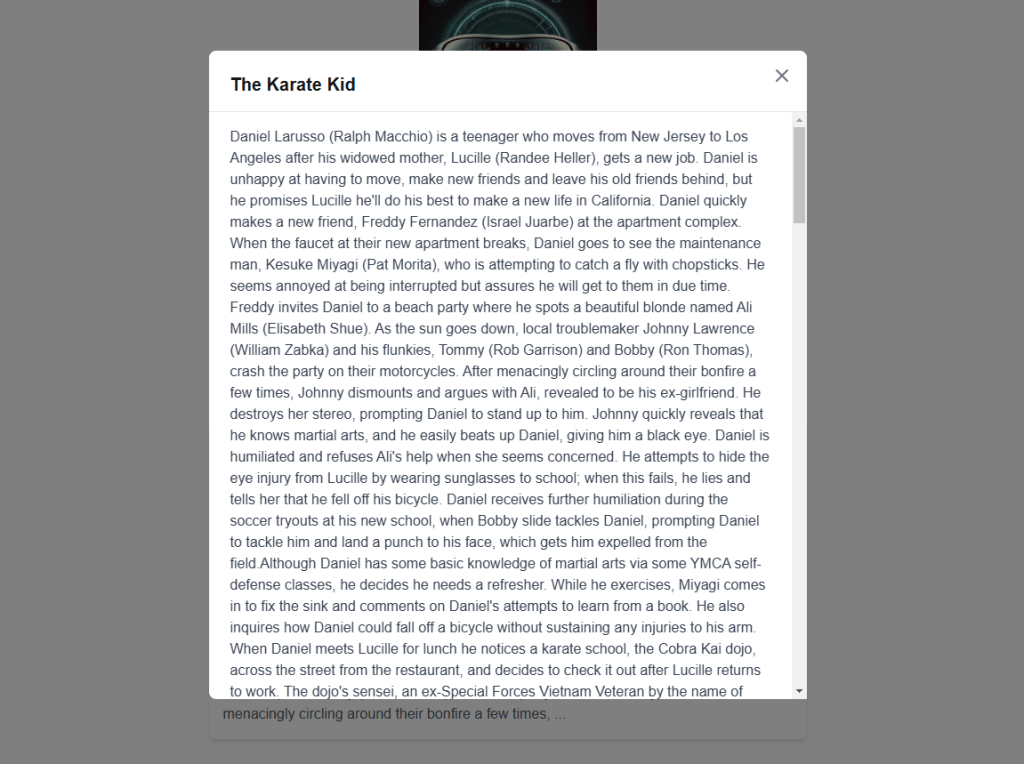
Modal.tsx – Displays:
Movie title as the modal header.
Full plot description in a scrollable window.
The final UI looks as follows:
Figure 1. An example Semantic Search Result (Plot results are truncated for a better display)Figure 2. When the truncated Plot Description is clicked, the full Plot Description can be viewed in a scrollable Modal windowFigure 3. The result of a Hybrid searchFigure 4. Results of a Lexical Search
Video: Running the BONO Search
This brings us to the end of the first version of the BONO search. Some Key takeaways are:
Semantic search does add value for the user but can bring in some unexpected results. We can lower the possibility of anomalies in the search results by filtering out results below a certain semantic score
The Hybrid search gives the best results overall by prioritizing results with high Lexical and Semantic search scores
Semantic searches do come at the cost of vectorizing both the Searched data and Search text. If the search text changes, the vector data would need to be re-updated.
Azure PostgreSQL Flexible Server extensions abstract the Azure Open AI details from the consuming API and allow us to integrate with the Open AI services at the database level. This ensures a more secure architecture as only the database server needs to connect to the Azure Open AI resource
Before we wrap up, let’s acknowledge the inspiration behind the BONO search system—U2’s classic hit, ‘I Still Haven’t Found What I’m Looking For’ is a song by U2, released in 1987 as the second single from their album The Joshua Tree. It’s a spiritual and introspective anthem that blends rock, gospel, and soul influences, featuring The Edge’s shimmering guitar work and Bono’s soaring vocals. The lyrics express a deep sense of yearning and searching—for love, meaning, faith, or something beyond the tangible. The song became one of U2’s most iconic tracks, resonating with listeners for its universal theme of an unfulfilled quest for something greater”…source: ChatGTP